A SAVVY mum saved £2,000 after creating a bespoke fitted wardrobe using Argos and B&Q bargains.
Claire Douglas wanted to give her son’s bedroom a revamp, creating a practical and tasteful space where he could sit and do his homework â and game, of course.
 Claire Douglas transformed these basic Argos wardrobes into a bespoke fitted feature
 Claire saved more than £2,000 by doing it herself
 She managed to complete the project in one weekend
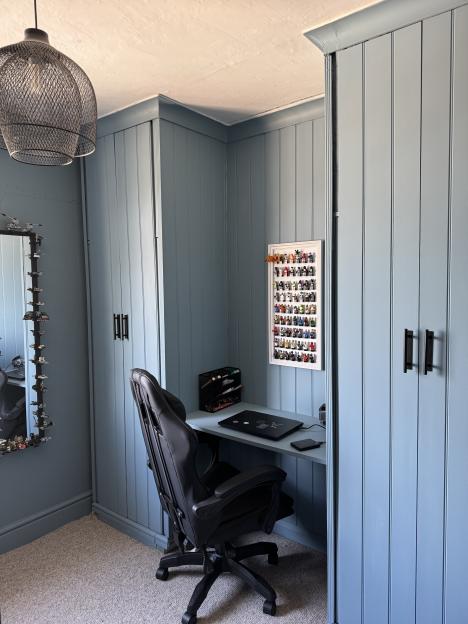 The final result looks expensive on a budget
But she was determined to complete the project on a budget, which meant that commissioning a carpenter to build bespoke fitted wardrobes was out of the question.
Instead, the interior designer purchased two standard flatpack wardrobes from Argos for around £80 each and styled them using MDF wall panel sheets from Panels by Sofia .
Claire, of Claire Douglas Styling , explains: “As well as a desk, we really needed somewhere to store clothes in my eldest son’s bedroom.
“He’d had a freestanding clothes rail for years which was a bit wobbly and the less-worn clothes were starting to collect dust.
“I love the look of built-in wardrobes so I came up with this storage hack to make the most of the space we had available.
“The beauty of this DIY fitted wardrobe project is that you don’t need many tools as you can get the MDF sheets pre-cut and sent to you.
“This also saves a lot of effort and makes it an achievable weekend project for a novice.”;
In total, Claire’s project cost just £912.By comparison, Checkatrade revealed the average cost of a standard fitted wardrobe in 2025 is £3,250 meaning the savvy mum saved £2,338.
Sharing her top tips and learnings from the DIY project, she said: “This was such a satisfying DIY project and I was able to save hundreds compared to if I was to have bespoke wardrobes fitted.
“If you need multiple panels, look into whether you can save money by buying a larger sheet and cutting it into multiple panels rather than buying many smaller ones. The pre-primed panels are a game changer too and will save you so much time and effort.
“To bring the overall look together, I’d recommend adding coving at the top of the MDF sheet where it meets the ceiling as this gives the appearance of truly built-in bedroom furniture.
“It also creates a really neat finish. You can buy pre-cut corners which are quick and easy to attach.”;
Here, she breaks down exactly how she created her DIY fitted wardrobe set-upin seven simple steps.
Step 1: Building and positioning the wardrobes
Claire said: “Before I started, I made sure the wardrobes would fit well within the space by measuring the ceiling height and width.
“I sketched out the wardrobe design which helped me to visualise how everything would come together.
“The freestanding wardrobes I chose were quite short, so I built a frame above them for additional storage.”;
Step 2: Building a CLS timber base frame
“To give the wardrobes a sturdy and level foundation, I constructed a CLS timber frame for them to sit on”;, Claire continued.
“As I was building a desk in between, I only wanted the base under the wardrobes, with a gap in the middle for the desk.
“If you are creating a full wall of fitted wardrobes, build your frame the entire length of the wall.
“To build the CLS base frame, I measured the footprint of the wardrobes and cut the CLS to size.
“Then, I assembled the frame using screws, ensuring it was level and secure. I fixed the frame to the floor to prevent movement and then placed the wardrobes onto the base frame.”;
Step 3: Framing the gap
Claire then filled the gap between the top of the wardrobes and the ceiling with a timber frame to “create the perfect fit”;.
She added: “Depending on the height of your freestanding wardrobes, you might only need to fix a baton along the top of the wardrobe edge or onto the ceiling to attach the tops of the MDF cladding sheets to.
 Claire broke down her the project in seven simple steps
“To build the frame, I measured the gap between the wardrobe tops and the ceiling and constructed a simple CLS timber frame to fit within this space. I then secured the frame to both the wardrobes and the ceiling with fixings.”;
Step 4: Fit your MDF wall panels
Claire then attached the MDF wall panels.
“We chose traditional bead and butt style panels â to the wardrobe sides, front frame and top gap to complete the built-in look”;, she said.
“The panels came pre-primed which saved a lot of time, effort and cost and can be cut-to-size and delivered.
“I used grab adhesive and screws to fix the panels to the wardrobes and CLS timber frame, making sure all edges aligned neatly for a seamless finish. Once the side panels were fitted, I covered the joins by attaching a piece of ribbed strip moulding over the edge.”;
“To create a cohesive finish, I attached a large MDF panel to the wall in-between the wardrobes to create a backdrop for the desk.”;
 She attached MDF panelling to the Argos flat pack furniture
 The panels gave the furniture an instant style boost
Step 5: Fitting an MDF desk between the wardrobes
To incorporate a desk between the wardrobes, Claire then measured the space in between and cut an MDF panel to be used as the desk surface.
“I then fixed the desk securely to the wardrobe sides using brackets and a spirit level to ensure the desk was level”;, she added.
Step 6: Extending the wardrobe to the ceiling
Claire said: “To fill in the gap above each wardrobe, I attached floor to ceiling MDF panels to the existing wardrobe doors.
“When cutting the MDF panels to match the width of the wardrobe doors, I allowed a gap so that the outer edge of the existing door could go inside the wardrobe when fully open.”;
Step 7: The finishing touchesââ
For her final step, Claire filled the screw holes and seams with wood filler and allowed them to dry before sanding everything until it was smooth.
She added: “I then applied two coats of paint to the wardrobes and desk.
“Finally, I installed our chosen door handles to the doors using sticky adhesive pads.”;

Eze Chidiebere Paul
I'm dedicated to creating high-quality content that informs, inspires, and delights. If you have any questions or suggestions, don't hesitate to get in touch. Happy reading!